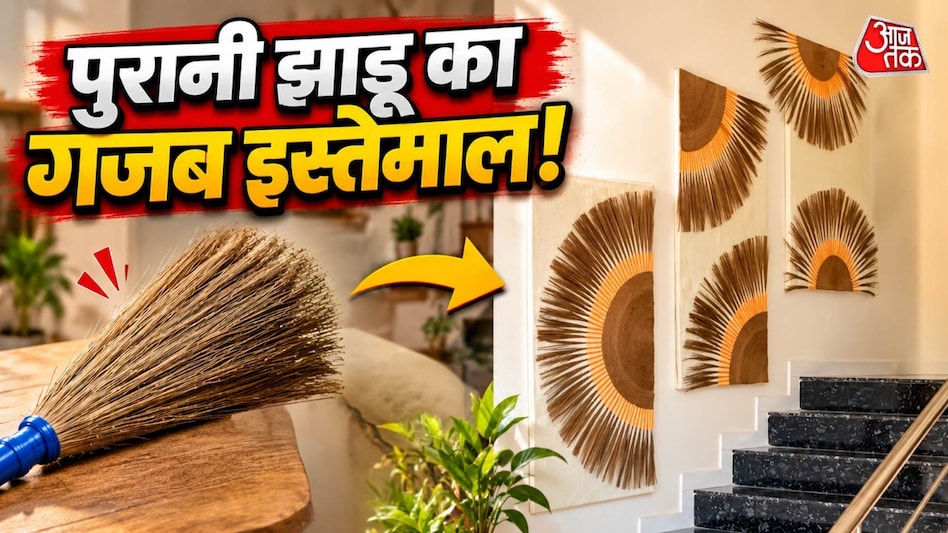
Old broom can be turned into a decorative wall element by yourself
Read more
Aaj Tak
www.aajtak.in

Old broom can be turned into a decorative wall element by yourself

You should not throw an old, worn-out broom in the trash. From this item, you can create a magnificent decorative element for the home that will attract the attention of others.

In daily life, people use brooms for cleaning. However, when a broom wears out or its bristles become short, most people consider it useless and throw it in the bin. Many believe that no benefit can be derived from an old broom. Nevertheless, it is amazing that this worn-out broom can be used to decorate your own home.

From an old broom, you can make a very beautiful decorative wall element. With colored thread, jute rope, and cardboard, you can turn it into a stunning wall panel that will amaze everyone who sees it. If you want to give your walls a stylish and modern look without large expenses, this option of wall art from an old broom can help you.

How to create a beautiful wall panel from an old broom

After the bristles of a broom, usually used in homes, wear out or become short, they are no longer used. Instead of throwing them away, you can create a design resembling sun rays. For this, the broom bristles are gathered into small bunches and decorated with colored threads. Then these bunches are connected using jute rope and cardboard, forming a beautiful decorative object.

The main advantage of this method is that you do not need to buy expensive decorative items to create it; you can use materials that are already at home and finish the item in the desired colors.

What you will need to make it?

To create a beautiful wall panel from an old broom, you will need the following things: bristles from an old marble broom. Tip: choose threads according to the color of your wall. Yellow, orange, golden, or cream threads will give the wall panel a beautiful look.

Step-by-step instructions for creating magnificent wall art from an old broom

  1. Separate the broom bristles: First, you need to separate the bristles from the old broom. Then, they should be cut into equal-length pieces depending on the needs. It is important that the bristles are not too small, as they will be used to create the design resembling the panel's rays.
  2. Decorate with colored threads: Next, form small bunches from the bristles. Tightly wrap the lower part of each bunch with an orange or yellow wool thread. This will make the ordinary bristles look beautiful and stylish. You can also alternate both colors.
  3. Create a base from cardboard and jute rope: Take thick cardboard and glue white paper to it. After that, roll the jute rope into a circle to get a ring. When the circle is formed, cut it in half with scissors to get a semi-circular design.
  4. Main part of the panel: This semi-circular design will be the main part of your wall panel. Securely glue the rope to the cardboard so that the structure is strong.
  5. Attach the bristles and create the design: Now glue the bunches of bristles decorated with colored threads along the edges of the jute rope. Arrange them so that they spread outwards, resembling sun rays. Try to leave equal distance between all bunches so that the design looks harmonious and balanced.
  6. Add final touches: After the entire design is ready, let the glue dry completely. Then hang the wall panel on the wall using a sturdy hook. Your inexpensive decorative item is ready.

Such a finished wall panel can make a simple wall attractive. It can be placed near the stairs, in the living room, bedroom, or hallway. The special feature of this sun ray design gives the wall a different look and adds a creative accent to the home decor.

If you want to make it even more beautiful, you can add small decorative lights or other elements of your choice. The main thing is to ensure that the wall panel is well glued and the bristles do not fall off easily.
Similar stories

How to hide an open drainage channel: 9 stylish and budget-friendly ways for your home
Read more
www.aajtak.in

How to hide an open drainage channel: 9 stylish and budget-friendly ways for your home

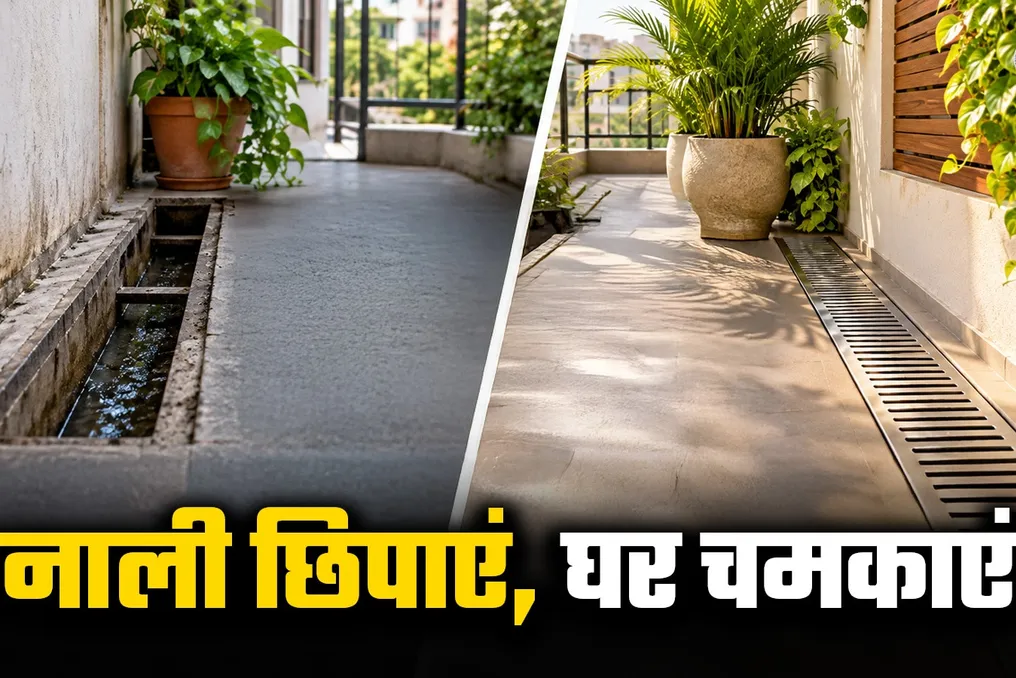
Even if a house is impeccably clean, the presence of an open drainage channel on a balcony, in a bathroom, or in a yard can spoil the overall appearance of the dwelling. Furthermore, such channels can become a source of unpleasant odors and dirt accumulation. Usually, in such cases, people consider installing expensive covers or removing flooring. However, there are simple and inexpensive methods that allow you to cover the channel without major renovation.

These methods not only help conceal the drainage but also contribute to creating a clean and aesthetic look for the home. Below are nine simple methods that will improve the appearance of the residence and simplify the cleaning process.

  1. Using steel covers

    If you have an open channel in your bathroom or on your balcony, you can cover it with a stainless steel lid. These lids have small holes that ensure free water drainage. They can be removed and the drain easily cleaned when necessary.

  2. Installing tile-mimicking drainage covering

    To make the channel less noticeable on the floor, you can install a special drainage covering that resembles tiles. This allows it to blend harmoniously with the flooring. When installing, ensure that water drains properly and choose a covering that is easy to remove for cleaning.

  3. Decorating the area around the channel with colored stones

    In the yard, garden, or on the balcony, you can make the area around the channel more attractive by scattering colored pebbles. White, gray, or black stones give the place a beautiful look. It is important to remember not to throw stones directly into the channel, as this can block water flow.

  4. Laying wooden decking tiles on the balcony

    To conceal the drainage and improve the appearance of the balcony floor, you can use wooden decking tiles. You must choose tiles that are resistant to moisture and water. They should be laid in a way that allows water to drain freely, and the tiles should be removable for maintenance.

  5. Creating a green look with artificial turf

    On the balcony, you can lay artificial turf around the drainage channel to give the area a green and picturesque look. The turf should be placed so that it does not cover the channel and can be easily removed for cleaning.

  6. Masking the channel with potted plants

    On the balcony or in the yard, you can place pots with standing plants next to the channel. This will draw the eye away from the channel itself to the plants, making the space more aesthetic. You should ensure that the pots do not impede water drainage and that they can be easily moved during cleaning.

  7. Covering visible pipes with a PVC box

    Drainage pipes visible on walls in the bathroom, kitchen, or on the balcony can be hidden using a PVC box. Choosing a box that matches the wall color will help discreetly hide the pipe. It is important, however, to ensure that the box can be opened for pipe repair if necessary.

  8. Installing a sturdy concrete coating for outdoor channels

    For an open channel located outside the house, you can install a sturdy concrete coating. This will make the area tidier. The cover must be one that can be removed when necessary. If vehicles pass over this area, you should choose a coating capable of withstanding significant weight.

  9. Using decorative metal mesh

    To give the channel a beautiful appearance, you can install a metal mesh with a decorative pattern. It can be chosen to match the tile or the house railings. The mesh must allow water to pass through and be removable for cleaning purposes.

How to make a stylish flower pot holder from old tires and gloves using cement
Read more
www.aajtak.in

How to make a stylish flower pot holder from old tires and gloves using cement

People often buy expensive decorative items and vases to give their home a luxurious look, decorating corners and center tables. However, purchasing such expensive items can sometimes lead to exceeding the budget. If you want to decorate your home for Diwali without spending much money, you do not necessarily need to buy expensive designer plant stands or statues for thousands of rupees.

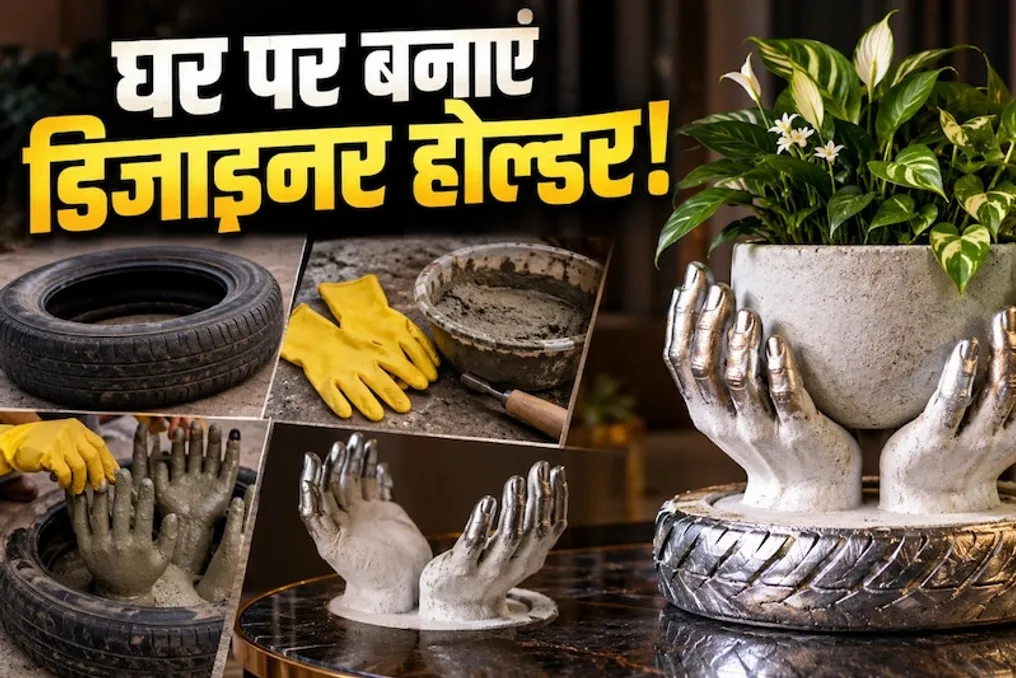
You can create a similar magnificent decorative element from things lying around the house. Using old rubber gloves, some cement, and an unused tire, you can make a unique flower pot holder that will add beauty to your home.

The design of this stand is so special that it will attract attention as soon as it is placed on the center table. Furthermore, placing it in an empty corner of the balcony or living room can give the home a premium look. Below is a guide on how to make a designer flower stand yourself for a small amount of money.

To start, mix cement with water in a bowl to get a solution. It is important that this solution is neither too thick nor too thin, and that there are no lumps in it. Then, put four rubber gloves onto a sturdy glass jar that should be wide enough so as not to cause problems when putting the gloves inside.

After that, slowly fill the gloves with the cement mixture. Make sure the cement covers the fingers well so that the shape of the hands is clearly visible. Use supports as needed to maintain the desired shape of the gloves. Then, leave them in a place where no one can touch them so that the cement hardens without shifting.

When the cement hardens, carefully cut and separate the rubber from the gloves. This way, you will get four hand-shaped sculptures. Do not rush when removing them, because if the cement has not dried completely, it may break.

Carefully examine the resulting hand sculptures. If any surface seems too rough, it can be lightly sanded after the cement has completely dried and hardened to smooth it out. These hands will then be attached to a round base so that space is created between them for placing a flower pot.

Now it's time to create the base for this designer holder. For this, take an old tire and place it on a flat surface over a plastic sheet. The tire can be used as a round mold. Pour the cement mixture into it and distribute it evenly. While the cement is wet, place the four hand sculptures at the required distance so that they stand upright, and there is enough space between them for the vase. Support the hands separately if necessary. Let the cement harden completely, and only then carefully remove the tire.

The surface of the base can acquire a special look thanks to the tire design, which will make your flower pot holder more attractive than a regular round stand. It is necessary to ensure that the connection between the hands and the base is strong so that the entire structure does not lose balance when placing the vase.

When the entire structure is completely dry and strong, it can be painted to give it beauty. First, clean the surface of dust. Then, paint the base and the hand sculptures white or silver. You can also use a combination of both colors.

A metallic silver tone can give this holder a modern and premium look, while white makes it classic. After the first coat of paint dries, apply a second coat as needed. If you are using spray paint, do it in a well-ventilated area.

Your flower pot holder is almost ready. Place a pot or flower vase that fits into it in the center. Decorate it with roses, lilies, or other colorful flowers. You can also plant a monstera in it.

How to hide damp and dirty walls in your home before Diwali without painting
Read more
www.aajtak.in

How to hide damp and dirty walls in your home before Diwali without painting

As the festival of Diwali approaches, everyone strives to make their homes look bright and festive. Some buy new curtains, while others decorate the house with various decorations. However, sometimes one damaged wall can spoil the beauty of the entire room, especially if there are signs of dampness, peeling paint, or black mold on the wall. Even after thorough cleaning, the house may look old and untidy.

In such cases, people often consider repainting or applying plaster, but this can require significant expense. Fearing that the budget might get out of control, many cancel such plans. If you also want to hide the damp walls of your home with minimal cost before Diwali, there are several clever ways that can help you. With these methods, you can conceal unsightly parts of the wall using decorations and give the room a new look. Nevertheless, it should be remembered that these methods do not eliminate the cause of the dampness; to do so, the source of moisture in the wall must be addressed.

Masking cracks and stains with wallpaper

If there are stains or peeling paint on a room wall, it can be updated by using wallpaper. There are many wallpaper designs available on the market. You can choose floral, marble, brick, or wood patterns according to your preferences, which will make the room wall beautiful. However, before sticking up wallpaper, be sure to check the wall. If there is dampness or mold in the wall, you cannot stick wallpaper directly onto it, as moisture may remain inside, promoting mold growth. Therefore, the dampness problem must first be eliminated and the wall thoroughly dried before wallpapering.

Decorating the wall with paintings or photo frames

If there are signs of dampness on a specific area of the wall, you can make the room more attractive by placing a large picture or photo frame there. This avoids the need to paint the entire wall. You can hang family photos, beautiful paintings, or traditional art according to your taste. During Diwali, colorful photo frames or paintings can give the room a fresh look. Furthermore, if there is dampness in the wall, the frame should be placed slightly away from the wall. It is also important to periodically check the space behind the frame to notice any moisture or mold in time.

Hiding damaged parts of the wall with houseplants

If you enjoy keeping plants at home, you can place houseplants in large pots in front of the damp wall. Plants such as Areca palm, Sansevieria, and Monstera give the room a beautiful appearance. You can also use beautiful pots for them. If desired, you can create a small green corner by placing two or three pots of different shapes together. This will partially hide the damaged area of the wall and add greenery to the room. However, the pots should not be placed flush against the wall; a small space must be left around them for air circulation and to prevent increased humidity.

Giving the wall a new look with wall panels

If you want to make the wall stylish, you can install decorative wall panels on it. PVC panels and other materials are available on the market in various designs and price ranges. You can choose them according to your preferences to give a new look to part of the wall. However, it should be remembered that installing wall panels does not solve the dampness problem. If there is moisture in the wall, the panels can trap mold inside, worsening the problem. Therefore, you must first find out the cause of the dampness and eliminate it before installing the panels.

Decorating the wall with curtains

If you want to decorate the room with minimal cost for Diwali, you can use beautiful curtains or fabric. You can hang a beautiful curtain on a stand in front of the wall or choose fabric that harmonizes with the overall room decor. This can give the room a new and beautiful look. You can choose light-colored or traditionally designed fabric according to your taste. However, fabric should not be hung directly on a wet or moldy wall, as this can lead to odor and moisture in the fabric. The fabric should be placed at some distance from the wall, and there must be a place for ventilation in the room.

Creating a beautiful corner with lighting and decorations

To decorate the room for Diwali, you can create a small decorative corner in front of the wall. For this, place a small table next to the wall and decorate it with decorative lamps, lanterns, a bouquet of flowers, or other beautiful items. You can also add garlands around the table. This will create a Diwali atmosphere in the room, and people's attention will be drawn to the decoration, not the wall. It is important to ensure that electrical lamps and decorative items are not in contact with damp areas.

Popular